Respiratory assessment and examination
Natalie Harper
Natalie Harper
BSc, MSc, RN, QN.
Respiratory Consultant Nurse. Dorset County Hospital NHS Foundation Trust
Practice Nurse 2021;51(10):26-31
When it comes to respiratory examination are we doing all we need to, and are we fully aware of what we are looking for? This, the second article in a series on clinical assessment and examination, gives an overview of a comprehensive respiratory examination, and the rationale behind it
Many would consider a respiratory examination as simply auscultating the chest. Until I had undertaken formal training, I too was under this illusion. As the saying goes, ‘we don’t know what we don’t know’, and I realise now, after many years of working with respiratory patients, that auscultation is one of the final elements of a full respiratory examination.
THE HISTORY
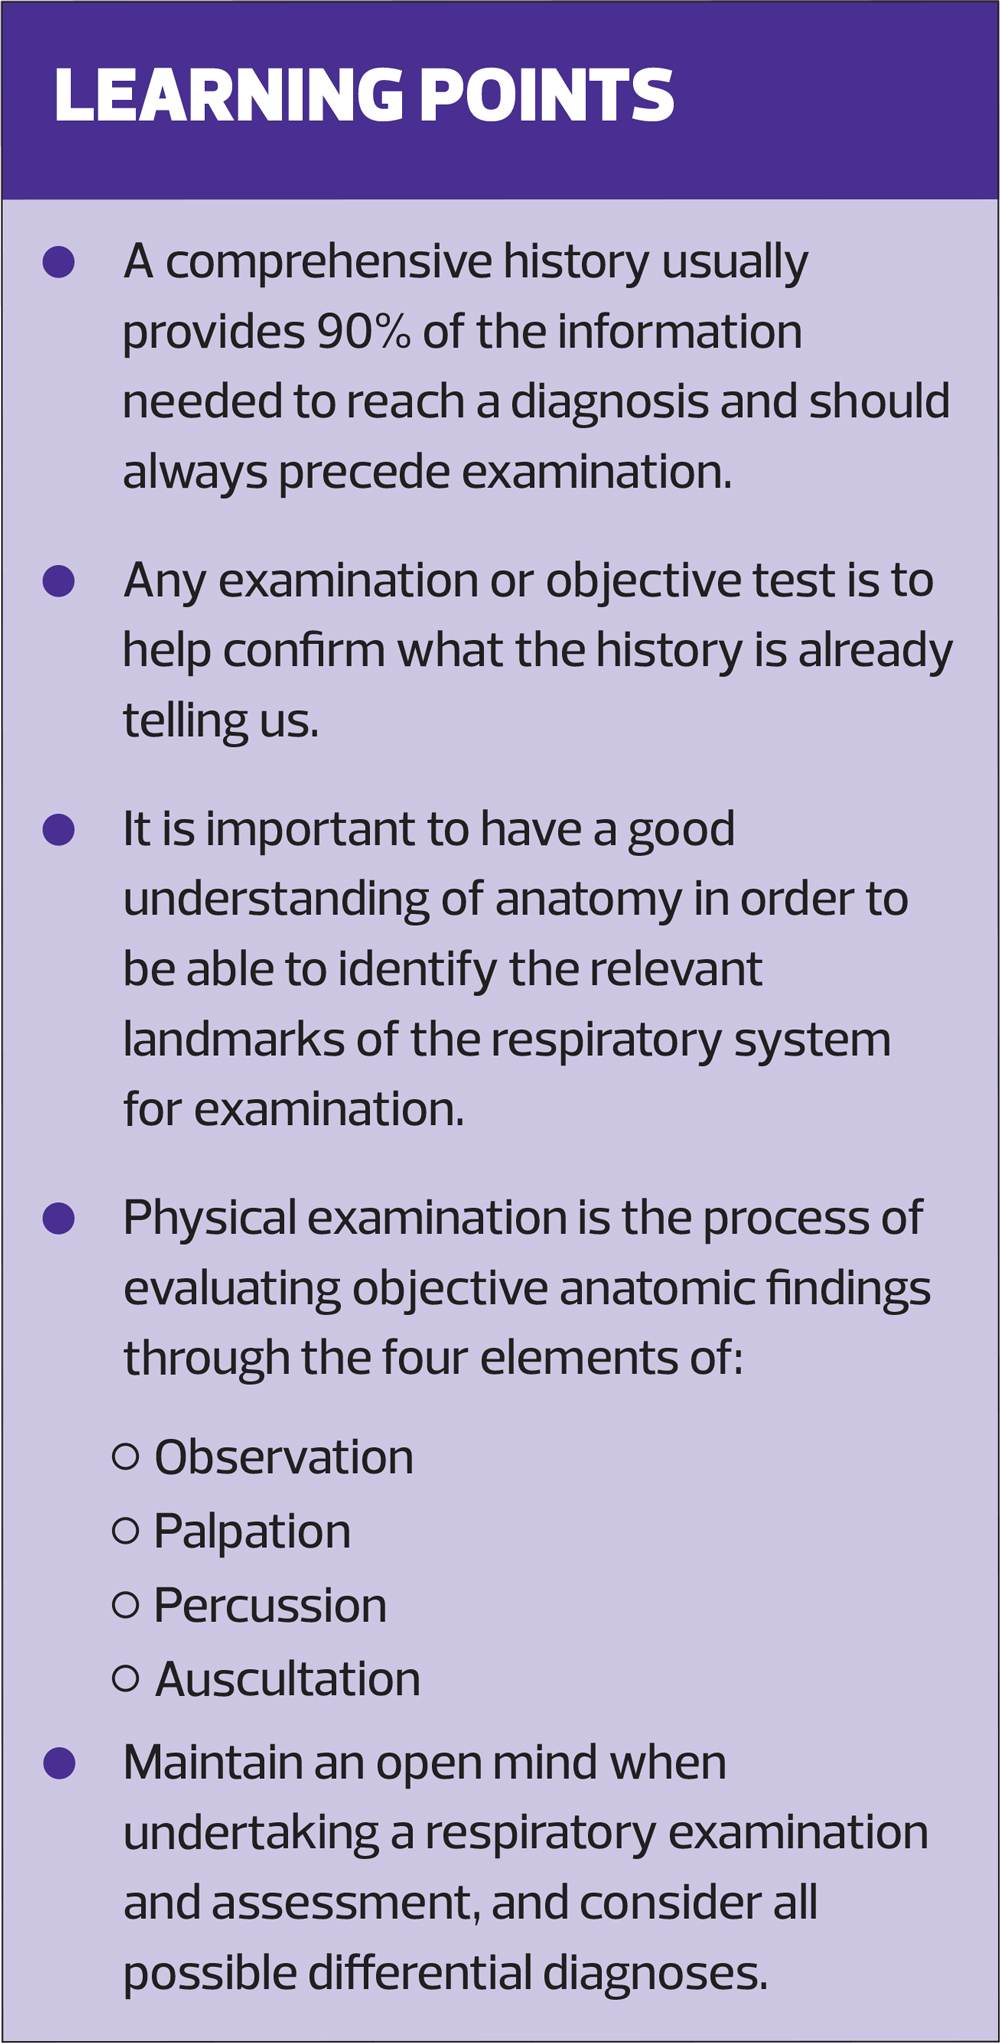
Examination should always have been preceded by a thorough history. Any examination or objective test is to help confirm what the history is already telling us. The history is usually 90% of how we reach the diagnosis.1
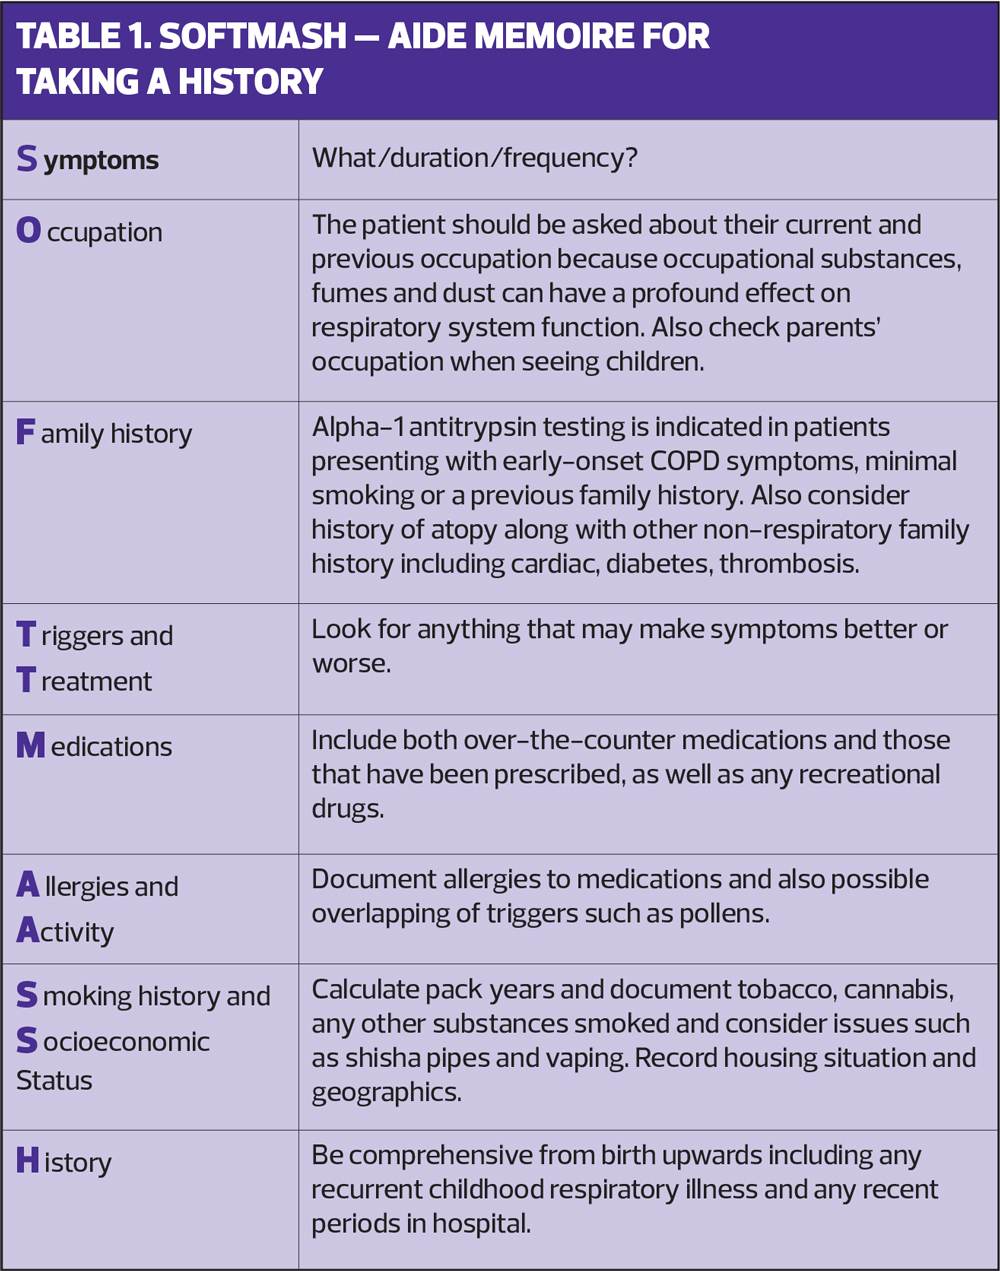
Taking a good history is an art in itself. It is a fine balance between allowing the patient to speak without interrupting them but also, with a finite amount of time, gaining information - asking the right questions in order to illicit what is required. The use of a model is helpful to keep you on track. There are many available such as the Calgary-Cambridge Guide,2 although this, like many models envelops the whole consultation. Others such as the acronym SOFTMASH is used to assess COPD.3 (Table 1) To take a detailed case history you would usually cover each acronym systematically in the order noted, so that all the relevant information is collected. The best way to use consultation models is to read them all, see which you like and take the best out of each to develop your own model.4
EXAMINATION
Once you are satisfied that you have everything you require from talking to the patient you can move on to the examination itself. Once you are versed in this it will only take a few minutes, although you will need longer to begin with while you find your own style and rhythm. Personally, I choose to undertake an examination systematically from head to toe, so as not to forget anything, but there is no right or wrong way as long as all elements are covered.
You need to ensure that your environment is satisfactory, both for you and the patient. Textbooks would advise you to carry out a respiratory examination on a couch at a 45 degree angle, yet in the real world we know this is not always possible. However, you cannot undertake a respiratory examination without the patient exposing themselves fully from head to waist, or, as my old tutor used to say, ‘from nipple to knee’. As should always be the case, you should identify and address dignity issues specific to your own practice areas.5
Physical examination is the process of evaluating objective anatomic findings through the four elements of:
- Observation
- Palpation
- Percussion
- Auscultation.6
We will be covering this in more detail.
Anatomy
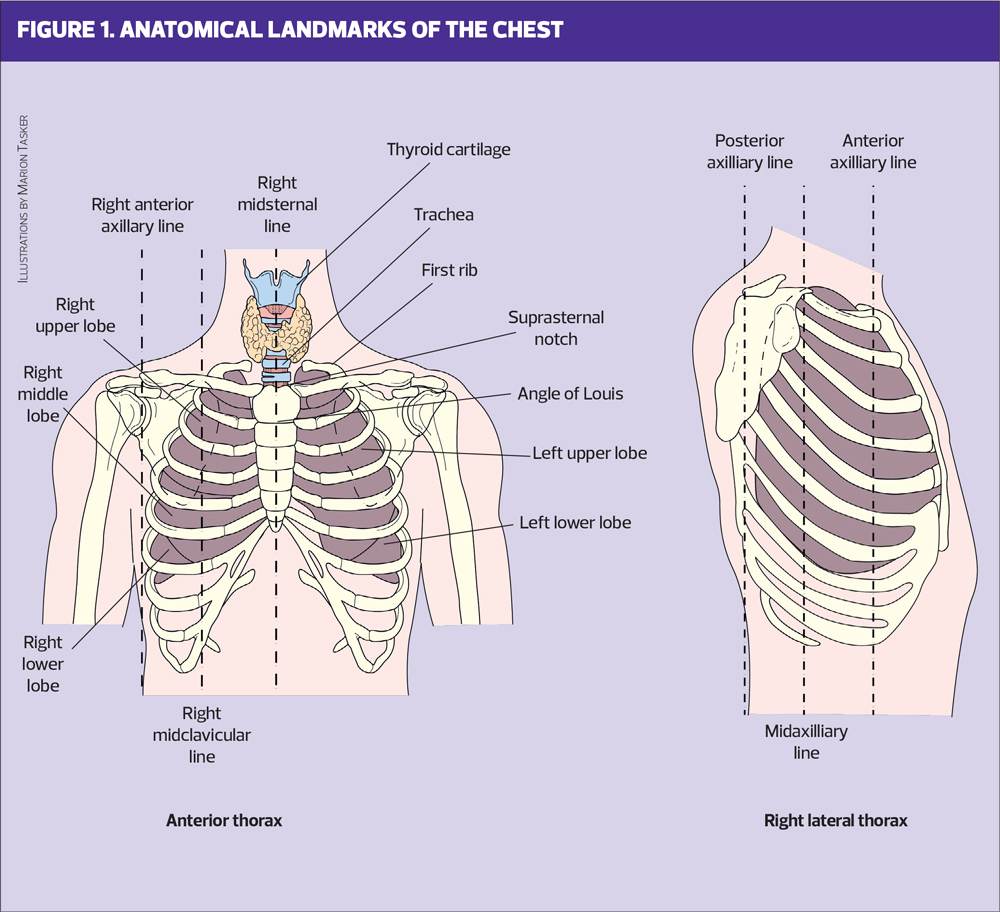
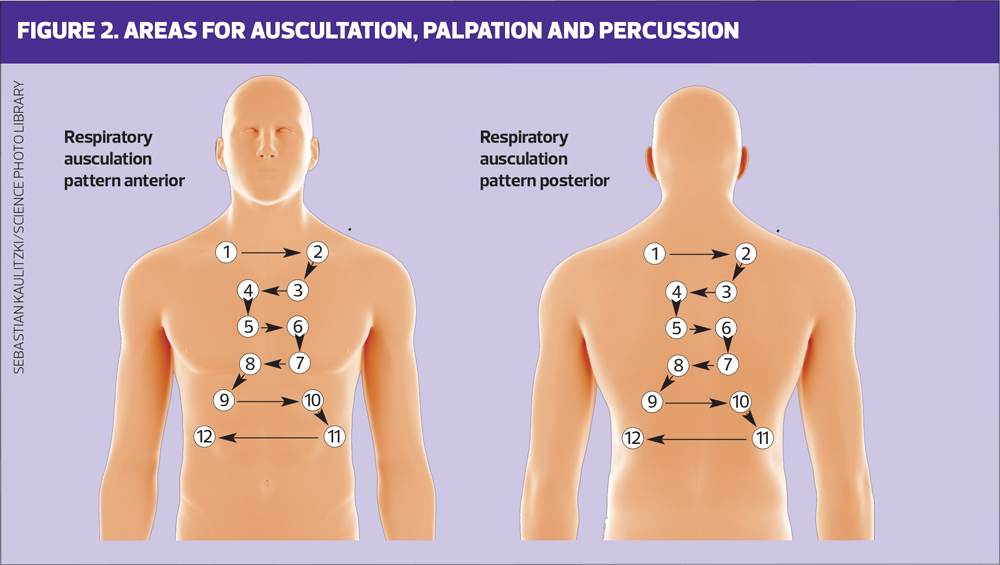
You need to have a good understanding of the structure and function of the human body in order to understand what you are looking at and to provide the most appropriate care.7 Figure 1 shows you the position of the lungs within the thorax, anteriorly and laterally. Figure 2 shows the areas to palpate, percuss and auscultate.
OBSERVATION AND INSPECTION
Much can be learnt from looking at the patient so, first and foremost, observe your patient.8 Go and collect them from the waiting area. The short walk to the consultation room, will give you a wealth of information. Is their gait normal? What is their breathing like when walking? Do they appear noticeably cyanosed? I have no doubt that you are already doing many of these things without even realising it. They take split seconds, but, all the time, you are forming conclusions.
Observation of thorax
Once your patient is exposed,then look for any obvious signs. Check them anteriorly and posteriorly. Look at the shape of the chest. Do they have pectus excavatum (more commonly known as pigeon chest) or pectus carinatum (barrel chest)? Either of these could affect the underlying organs and can give clues to an underlying condition, such as COPD causing hyperinflation of the lungs, or osteoarthritis stiffening the rib cage.
Assess for spinal deformities such as kyphosis (forward curvature) or scoliosis (sideways curvature) or a kyphoscoliosis (a combination of the two). A commonly missed sign is lordosis, which is seen, for example, in pregnant women and is an exaggerated inward curve of the spine.
Check for scarring as this could indicate previous trauma or surgery. (Even after completing a full history I once examined a patient and noted the presence of a scar. On questioning the patient announced that that was where he had had a lung removed!)
Look at the pattern and rate of breathing, a normal rate for an adult is approximately 12 respirations per minute.9 Is the patient having to use accessory muscles to aid in respiration? This demonstrates a greater effort of breathing. In children this usually causes abdominal breathing. Also in children, note if there is a tracheal tug (the inward pull of the trachea) indicating difficulty in breathing. Do they have a flail chest? These are abnormal respiratory movements often associated with multiple rib fractures. Check the patient’s respiratory rate for a full minute and record the result along with any comments on the rhythm, depth and effort.
PALPATION
Elements of observation and palpation overlap at some stages.
Head and neck
Check the glands within the head and neck. Common causes for enlarged lymph nodes are:
- Viral, bacterial or parasitic infections
- A response to injury to the area.
Uncommon causes could include:
- Measles
- Rheumatoid arthritis
- Tuberculosis
- Sexually transmitted diseases.
Lung cancer or lymphoma may also present with lymphadenopathy in the neck and it is important that these less common causes are not missed.
Examine the throat. Check the thyroid gland while standing behind the patient, but do ensure you talk them through what you are doing. There is nothing more disconcerting than someone putting their hands around your throat if you do not know their intentions.
Check the trachea for alignment abnormalities. If there is a pleural effusion the trachea will shift away from affected side, as it will with a tension pneumothorax (although this is rarely seen in primary care). The opposite shift, towards the affected side, will be noted with fibrosis or atelectasis and, in the case of pulmonary consolidation you will see no shift at all.
Next, place one or two fingers into the supra-sternal notch and ask the patient to breathe in. In the case of respiratory distress the cricoid will come down and hit the back of your fingers due to the downward pull of the trachea.
The last thing to check in the neck is the presence of a raised jugular venous pressure (JVP) which will indicate the possibility of cardiac involvement. The external jugular vein is lateral and anterior to the sternocleidomastoid muscle, while the internal jugular vein is medial and deep to it.
Eyes and mouth
Moving to the front of the patient, check the eyes. Look at the conjunctiva for any signs of jaundice or anaemia, a common cause of breathlessness. You can also check for other conditions such as corneal arcus (high cholesterol, due to diet or possibly liver disease) and xanthelasma (lipid deposits).
Moving downwards to the mouth, ask the patient to open their mouth fully so that you can see the colour of the buccal mucosa. This can reveal cyanosis before it becomes apparent in the lips. At the same time, look for other signs such as angular stomatitis, glossitis or a dry mouth. These can be caused by fungal infections, allergic reactions, injury, hormonal factors, vitamin deficiency, hypoxia, dehydration/ or salivary gland disorders.
Hands
Check the hands for any signs of nodes (Heberden and Bouchard), both of which could be indicative of osteoarthritis.10 Look for signs of tar staining, revealing a smoking history.
You will also be feeling for any clamminess, or whether the hands are cold. This could indicate circulatory problems or other conditions such as Raynaud's.11 Turn the hands over and check the colour on both sides.
Check the nails for capillary refill. This should be within 2 seconds and a delay could indicate circulatory/cardiac issues. Check for signs such as splinter haemorrhaging, a sign of endocarditis.12
Ask the patient to extend their arms out straight in front of them, palms facing downwards. Here you are looking for signs of what is called a ‘C02 flap’; the patient will not be able to hold their hands still and will demonstrate a coarse tremor. This is different from a fine tremor which may be due to too much beta2 agonist, or other conditions such as Parkinson’s disease.
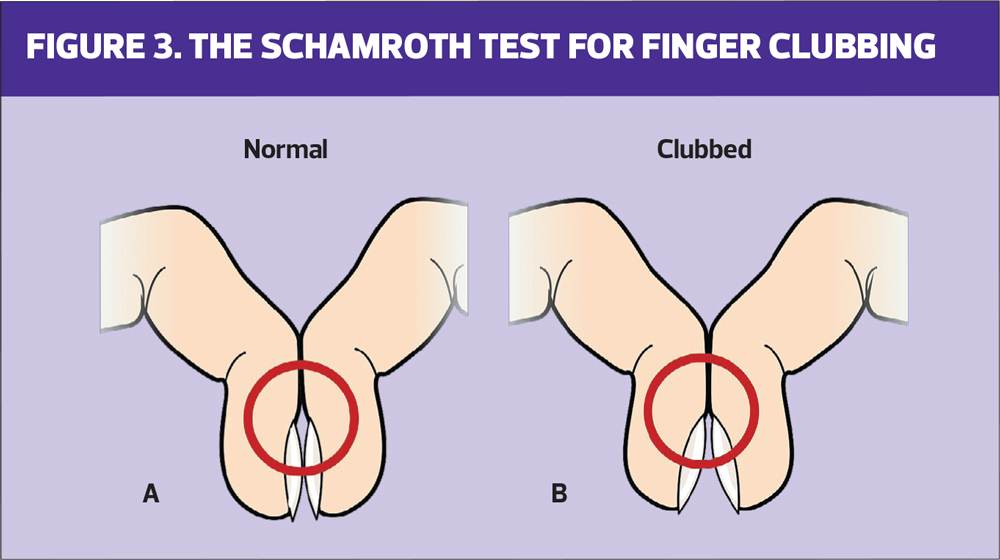
Lastly, check for finger clubbing. Clubbing is the abnormal enlargement, thinning and alteration in the angle of the finger and the nail bases.13 Ask the patient to place the nails of 2 fingers together. Figure 3A shows a negative Schamroth sign. There is a diamond of light visible at the base of the nail. If this is missing it could indicate finger clubbing. Clubbing can be perfectly benign, with the patient often being born with this, or it could be indicative of fibrotic conditions or lung cancer. It is rarely, if ever, seen in COPD alone.
At this point check the heart rate. This should be done manually for a full minute, to assess rate and rhythm and to check for any bounding or threadiness or any irregularity that you would not pick up with equipment alone.
Chest
The first element on palpating the chest is to check for any discomfort. Ask your patient if anywhere is tender or painful. Palpate with the palm of your hand across the chest wall feeling for any rib deformities, nodules, and areas of tenderness.
Move on to look at chest expansion. Place your hands with fingers spread apart beneath your patient’s arms, on the sides of the chest, about 2 inches below the axilla. Ask the patient to take a deep breath in and watch your thumbs as they move apart. You are looking for symmetry of motion between the two sides. If only one hand moves then it implies that air cannot enter the affected side, such as in the case of a pneumothorax or pleural effusion or even pneumonia.14 If there is bilateral reduction it is sometimes hard to detect and further investigation such as a chest X-ray may be required.
Next, palpate for tactile fremitus. To do this use the ulnar border of the hands and palpate the patient's chest, anteriorly and posteriorly. Start at the top of the chest and move to the bottom, comparing both sides. Ask the patient to say something, such as 99, each time you reposition your hand. You are feeling for vibration. This should be slight and will generally decrease as you move down the chest. If the vibration is strong this generally indicates consolidation, possibly caused by pneumonia or thick mucous. This is because a solid area vibrates more than an air-or fluid-filled space. If the vibration is decreased or absent this could be because of a pleural effusion or a pneumothorax.15
PERCUSSION
The chest should be percussed in four areas on each side anteriorly, mid clavicular line, always comparing and contrasting right to left, and two areas laterally. Depending on whether you are right or left handed, it is usual to strike the opposite finger twice in quick succession before pausing to move onto the next area. By percussing the chest wall you are setting the underlying tissues in motion producing both audible sounds and palpable vibrations.16 Percussion will generally penetrate about 5-7cms into the chest and therefore will not help to detect deep-seated lesions.
As with elements of palpation, the purpose of percussion is to detect whether the underlying lung tissue is air-filled, fluid-filled or solid.6
- Flat percussion notes: high pitched sounds with soft quality, heard over tissue where there is no air.
- Dullness: medium pitched sounds, generally heard where there is a combination of solid and fluid filled areas, or over bones.
- Resonance: indicates underlying normal lungs and the sounds are usually low pitch in nature. In contrast, hyperresonance sounds are lower in pitch and generally heard over hyper-inflated lungs.
- Tympany: drum like sounds which can occur over a gas or air-filled area.17
AUSCULTATION
It may sound obvious, but you need to ensure you have a good stethoscope and that it is used correctly. The bell of the stethoscope is generally used to detect low-pitched sounds found at the apex of the lungs above the clavicle, while the diaphragm is used to detect high-pitched sounds in the rest of the chest.18
As with all elements of a respiratory examination, this aspect will require practice and, if you are new to this role, it is vital that you are supervised and mentored by an appropriately qualified colleague before taking on an autonomous role.
The majority of the patients you see will, in all probability, have normal chest sounds. Over time, however you will start to hear other sounds. Initially you may not know what these are but with practice and mentoring you will come to understand the sounds themselves and what they can signify. One way to aid this process is to listen to some of the videos that can be accessed online.19 (See Resources)
Normal breath sounds
Bronchial, vesicular, or bronchovesicular sounds are usually normal in nature.
- Bronchial sounds: generally quite loud, harsh, and high pitched and are typically heard over the trachea or at the right apex. They are predominantly heard during expiration. If these are heard in other areas of the lungs then this can be abnormal.
- Vesicular breath sounds: soft, low pitched, predominantly inspiratory, and heard at the posterior lung base.
- Bronchovesicular sounds:
a combination of the previous sounds and can be heard during inspiration and expiration and have a mid-range pitch and intensity. They are commonly heard over the upper third of the anterior chest.20
Adventitious breath sounds
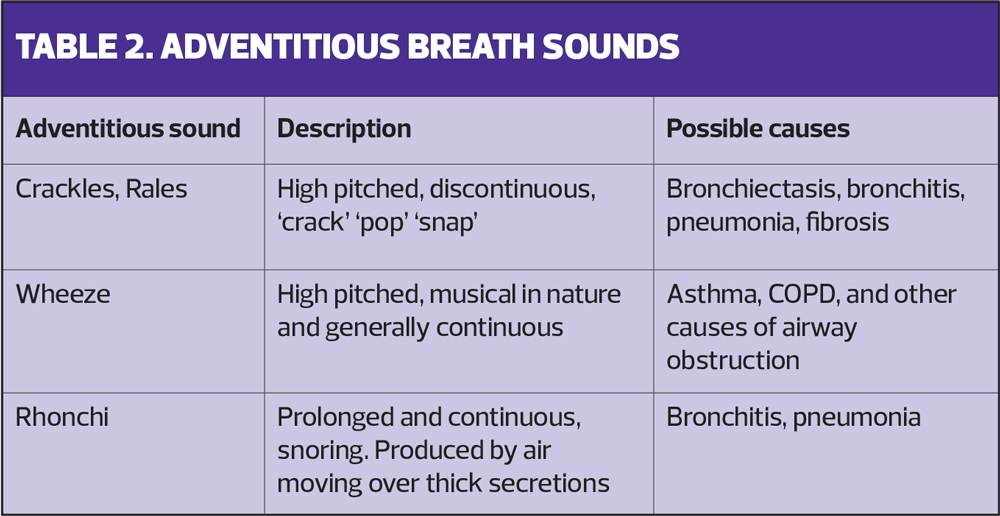
Adventitious sounds refer to sounds that are heard in addition to the expected breath sounds mentioned above. These can be referred to as crackles, wheezes, rhonchi, fine crackles or stridor.
- Crackles: these can be fine, medium or course and are high-pitched popping sounds, like gunfire going off in the distance. Coarse crackles are low-pitched gurgles. Most often these are heard during inspiration but can be heard on expiration also. If heard in the lower bronchial tree they appear to produce a wet sound or if higher up, then this results in a dry sound. These sounds tend to be discontinuous.
- Wheeze: a wheeze is caused by air flowing via a constricted airway and is usually high pitched and musical sounding in nature. They are heard on both inspiration and expiration and tend to be bilateral. If you hear a unilateral wheeze, then this may have been caused by an obstruction from a foreign body.
- Rhonchi: a sound heard when air flows over thick secretions. They tend to be prolonged and continuous. Until you are more experienced in your auscultation skills you may mistake this for crackles. If you are unsure then ask the patient to cough and, if the sound disappears it is usually rhonchi.
- Fine crackles: these appear soft, very short and high pitched. They are heard in the late inspiratory phase and often associated with pulmonary fibrosis or pulmonary oedema.
- Stridor: generally reserved for children and is a high-pitched sound that is usually heard on inspiration. It's usually caused by an obstruction or narrowing of the airway. The exact sound of stridor depends on location of the obstruction.
Lastly you may hear what is referred to as a silent chest. This is indicative of someone who is critically unwell as this tells us that no air is moving in or out of the lungs and urgent medical intervention of some kind is therefore required.
Table 2 gives you an idea of some of the conditions commonly associated with adventitious chest sounds.
LEGS AND FEET
Some would say that you have reached the end of the examination. However there are still a couple more elements to check as you move down the body.
Look at the patients’ lower legs. You are assessing for any signs of tenderness or warmth or swelling which could be signs of a deep vein thrombosis. And finally check for signs of pitting or sacral oedema indicating the presence of fluid retention. There are a variety of non-respiratory causes for this but it could possibly indicate end stage respiratory disease/pulmonary hypertension.
SUMMARY
The human body is a wonderful thing and, if there are problems, it will always give us clues. Our job is to pick up on these clues in order to reach a definitive diagnosis, while always keeping an open mind as to the cause of the problem. If we listen and look properly invariably the answers are right in front of us.
It has not been possible to include every single scenario and differential diagnosis in this one article, but I hope that it has provided you with some further information to take forward in practice, to help you when examining respiratory patients and to make the clinical reasoning necessary to aid your patients easier for you.
REFERENCES
1. Muhrer J. The importance of the history and physical in diagnosis. Nurse Pract 2014;39(4):30-35
2. Kurtz S, Silverman J. The Calgary-Cambridge Referenced Observation Guides: an aid to defining the curriculum and organising teaching in communication training programmes. Med Educ 1996;30(2):83-9
3. Cornforth A. Diagnosis and management of COPD. Nurse Prescr 2012;10(2):64-71
4. GPonline. Consultation models in practice: How to incorporate consultation models into your 10-minute consultation. C2010 https://www.gponline.com/consultation-models-practice/article/988629
5. Baillie L, Gallagher A. Respecting dignity in care in diverse care settings: Strategies of UK nurses. Int J Nurs Pract 2011;17(4):336–34
6. Walker H, Hall W, Hurst J. Clinical Methods: The History, Physical, and Laboratory Examinations. editors. 3rd edition. Boston; Butterworths; 1990
7. Boore J, Cook N, Shepherd A. Essentials of Anatomy and Physiology for Nursing Practice. London; Sage publications Ltd; 2016
8. Middleton S, Middleton P. Assessment and investigation of patients' problems. In: Pryor JA, Prasad SA, eds. Physiotherapy for Respiratory and Cardiac problems. 3rd edn. London; Churchill Livingstone; 2002
9. Jevon P. Chest examination: Part 1 – chest palpation. Nurs Times 2006;102(44):26
10. Alexander C . Heberden’s and Bouchard’s nodes. Ann Rheum Dis 1999;58(11):675-678
11. Block J, Sequeira W. Raynaud's phenomenon. Lancet. 2001; 357 (9273): 2042-2048.
12. Shunya U, Teruki D, Akihiko K, et al. Janeway lesions and splinter hemorrhages in a patient with eosinophilic endomyocarditis. JAMA Dermatol. 2015;151(8):907-908
13. Cox C. Respiratory assessment. In: Esmond G, ed. Respiratory Nursing. London; Balliere Tindall; 2001.
14. Jevon P, Ewens B. Monitoring the critically ill patient. London; Blackwell Science; 2002.
15. Adam S, Osborne S. Critical Care Nursing Science and Practice. Oxford; Oxford University Press; 2005
16. Bickley LS. The thorax and lungs. In: Bates' Guide to Physical Examination and History Taking. 8th edition. Philadelphia; Lippincott; 2015.
17. Harris A. Listening-touch, affect and the crafting of medical bodies through percussion. Body Soc 2015;22(1):31–61
18. Dougherty L, Lister S. The Royal Marsden Manual of Clinical Nursing Procedures. Chichester; Wiley; 2015.
19. Physiological pathological breath sounds. 2021. https://www.youtube.com/watch?v=64bLgnv1mHA.
20. Zimmerman B, Williams D. Lung Sounds. Florida; StatPearls Publishing; 2021
Related articles
View all Articles