Best practice in phlebotomy
ALYS BUNCE
ALYS BUNCE
RGN, BSc Nursing, BSc Psych, PGCE, MFTM, RCPS(Glasg)
Specialist immunisation and travel health nurse
smallscratchtraining.co.uk
Practice Nurse 2025;55(2):9-13
Taking blood is a routine task for general practice nurses, but many who are new to primary care have had little experience of phlebotomy in previous roles. Even experienced nurses may not have had formal training. So, what constitutes best practice and why?
Nurses who are new to general practice may have had little practical experience of drawing blood, and even experienced GPNs may have learned ‘on the job’ or by the ‘see one-do one-teach one’ style rather than doing formal courses. In primary care, nurses must have proper training to develop confidence and competency in phlebotomy, as it is often an integral part of chronic disease monitoring, diagnostic testing, and routine health checks. Clinical practice can be dangerous when health care professionals do not understand the rationale for the skill they are practising. So, what constitutes best practice and why? What are the pitfalls, and how do you avoid them? What is useful to know if you are brand new to this important skill?
THE GUIDELINES FOR BEST PRACTICE
Much of our guidance can be extrapolated from the WHO Guidelines on drawing blood: best practices in phlebotomy (2010).1 Although some 15 years old, this was a seminal piece of literature based on a huge systematic review of the evidence and advice of many experts at the time (17 authors, six advisors, and two peer reviewers and use of many references used to formulate the final recommendations). Other guidelines for use in the UK come from NICE quality standard 139, Healthcare-associated infections: prevention and control in primary and community care.2 And of course, we must also look at the guidelines provided by the manufacturers of phlebotomy devices on how they recommend their products be used. The two major suppliers of phlebotomy equipment in the UK are Beckton Dickenson (BD-vacutainer) and Sarstedt (S-monovette). Local guidelines should ideally be congruent with all of the above too, but always check your own policies and procedures before performing the task.
Ensuring a smooth and successful blood draw starts with good preparation and a thorough background knowledge of the evidence behind everything that happens in a phlebotomy clinic.
Combining the recommendations from these sources, the process can be broken down into a series of steps.
THE KEY STEPS
Patient identification
Proper identification prevents specimen mix-ups and ensures the right tests are conducted on the correct patient.1 In general practice, incorrect identification can lead to diagnostic errors, impact on treatment decisions, and could even be fatal. Always confirm the patient’s identity using at least two identifiers (for example, name and date of birth) and check for any specific requirements such as fasting.
Informed consent
Phlebotomy is an invasive procedure and consent is vital. Informed consent means that sufficient information must be provided to the person to enable them to make a balanced and informed decision about their treatment. As well as a general explanation of the procedure, there is also a fundamental duty to explain the risks inherent in the procedure and the risks that might come from refusing it.3 In a general practice setting, this is particularly important as for some patients, it may be their first ever blood test. In a busy general practice, it can be easy to get complacent about the task if one does it every day.
Hand hygiene and PPE
Gloves can be overused in health care and the RCN started a ‘reducing glove use campaign’ in 2022,4 but it is important to note that they excluded phlebotomy as a procedure that wouldn’t necessitate gloves. Therefore, wash hands and DO wear gloves to maintain infection control standards. Infection control is especially crucial in primary care, where patient turnover is high, and facilities may not have the same sterile conditions as hospitals. Hand washing keeps infection risk low for patients, and glove-wearing can protect the phlebotomist. Although a phlebotomy needle can easily penetrate gloves in a needlestick injury, gloves have been shown to reduce the number of infectious agents that get into the skin in the event of one, by a considerable amount. For example, one study evaluated factors affecting blood volumes transferred to the skin during simulated needlestick injuries.5 The findings indicated that glove material reduced the transferred blood volume by 46% to 86%, depending on needle size and penetration depth.
Patient positioning
Ensure the patient is suitably positioned if they have any risk factors for fainting or previous history. Proper positioning reduces the risk of vasovagal syncope.1 The likelihood of fainting during a phlebotomy procedure is relatively low, affecting around 2.5% of people.6 Notable risk factors include dehydration, low blood pressure, anxiety about needles, young age, female gender, and a history of fainting episodes during phlebotomy in the past.6 In general practice, these risk factors are common in people having blood taken. Make a good assessment of risk factors and mitigate the risk before adverse events happen.
Palpation
Developing a systematic approach to vein palpation is essential. Feel for a vein that is bouncy, not hard or fragile. Consider the direction it is going in so you can angle the needle correctly. Consider how deep it is and what size needle might be the most appropriate. Vein palpation skills improve with experience and are essential for accurate site and equipment selection.7
Skin cleansing
In the last issue of Practice Nurse we explored skin cleansing in relation to injections.8 In contrast to injections, with phlebotomy it is recommended to cleanse the site with 70% alcohol.1,2 Key differences here are that phlebotomy is a more invasive procedure, requiring direct access to the veins which are circulating blood (and anything you put into it) very quickly around the body, the needle is in situ longer, and blood samples themselves do not have an adaptive immune system while sitting waiting to be analysed at the lab. The WHO guidance1 suggests cleaning the skin in a circular motion in a 2.5cm radius to the site ensuring alcohol contact with the skin for 30 seconds and allowing it to dry for 30 seconds prior to the puncture. This is to allow time for complete disinfection and also to avoid any contamination to the tubes, especially where coagulation and clotting samples are involved and need to be accurate as possible (alcohol being an anticoagulant).
Tourniquet use
Veins dilate and increase in surface area immediately when a tourniquet is placed correctly. The tourniquet creates temporary pressure and an occlusion of blood flow, making it easier to identify and puncture the veins. Apply the tourniquet snugly but not too tightly (aiming to restrict the venous blood flow, but not the arterial blood flow), and ideally for no longer than one minute to avoid haemoconcentration, which can affect lab results.9 This is another skill that requires experience and practice. The WHO guidelines recommend using single-use disposable tourniquets or wipeable ones, quoting a study that that found a 25% contamination rate with MRSA on tourniquets that were re-used.10 This was a hospital study, but still gives an indication that tourniquets can harbour bacteria and be a source of healthcare-based infection in general practice too.
Site selection
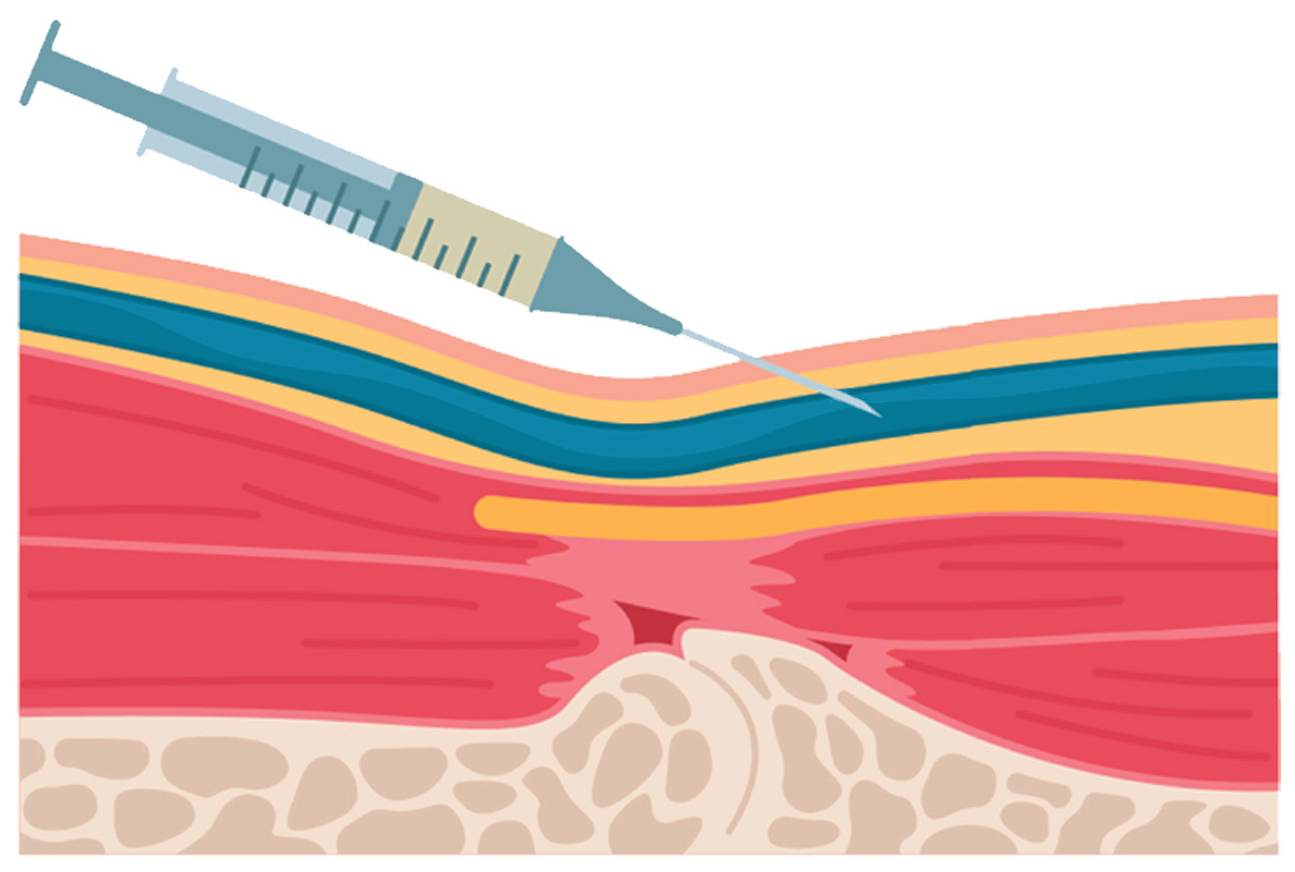
Choosing the right vein is crucial for a successful venepuncture, but also for safety. If healthcare staff haven’t done any training on anatomy of the veins in the arm, they might not apply principles of anatomy to their practice and could be tempted to just go for the one that is ‘biggest’ – which is not necessarily the ‘safest’. The basilic vein, median cubital vein, and cephalic vein are superficial veins that are frequently selected for venepuncture. Relatively rare, but potentially serious complications including nerve injury and mistaken arterial punctures have been reported. Therefore, the anatomical characteristics of the sites at which venepuncture is performed need to be clearly understood to prevent these complications. The median cubital vein in the antecubital fossa (ACF) is usually the best option due to its size and accessibility.1 This, and the cephalic vein, are generally considered safer than the basilic,11 where a mis-puncture involving the medial antebrachial cutaneous nerve nearby could result in complete loss of sensation to the skin of the medial forearm.
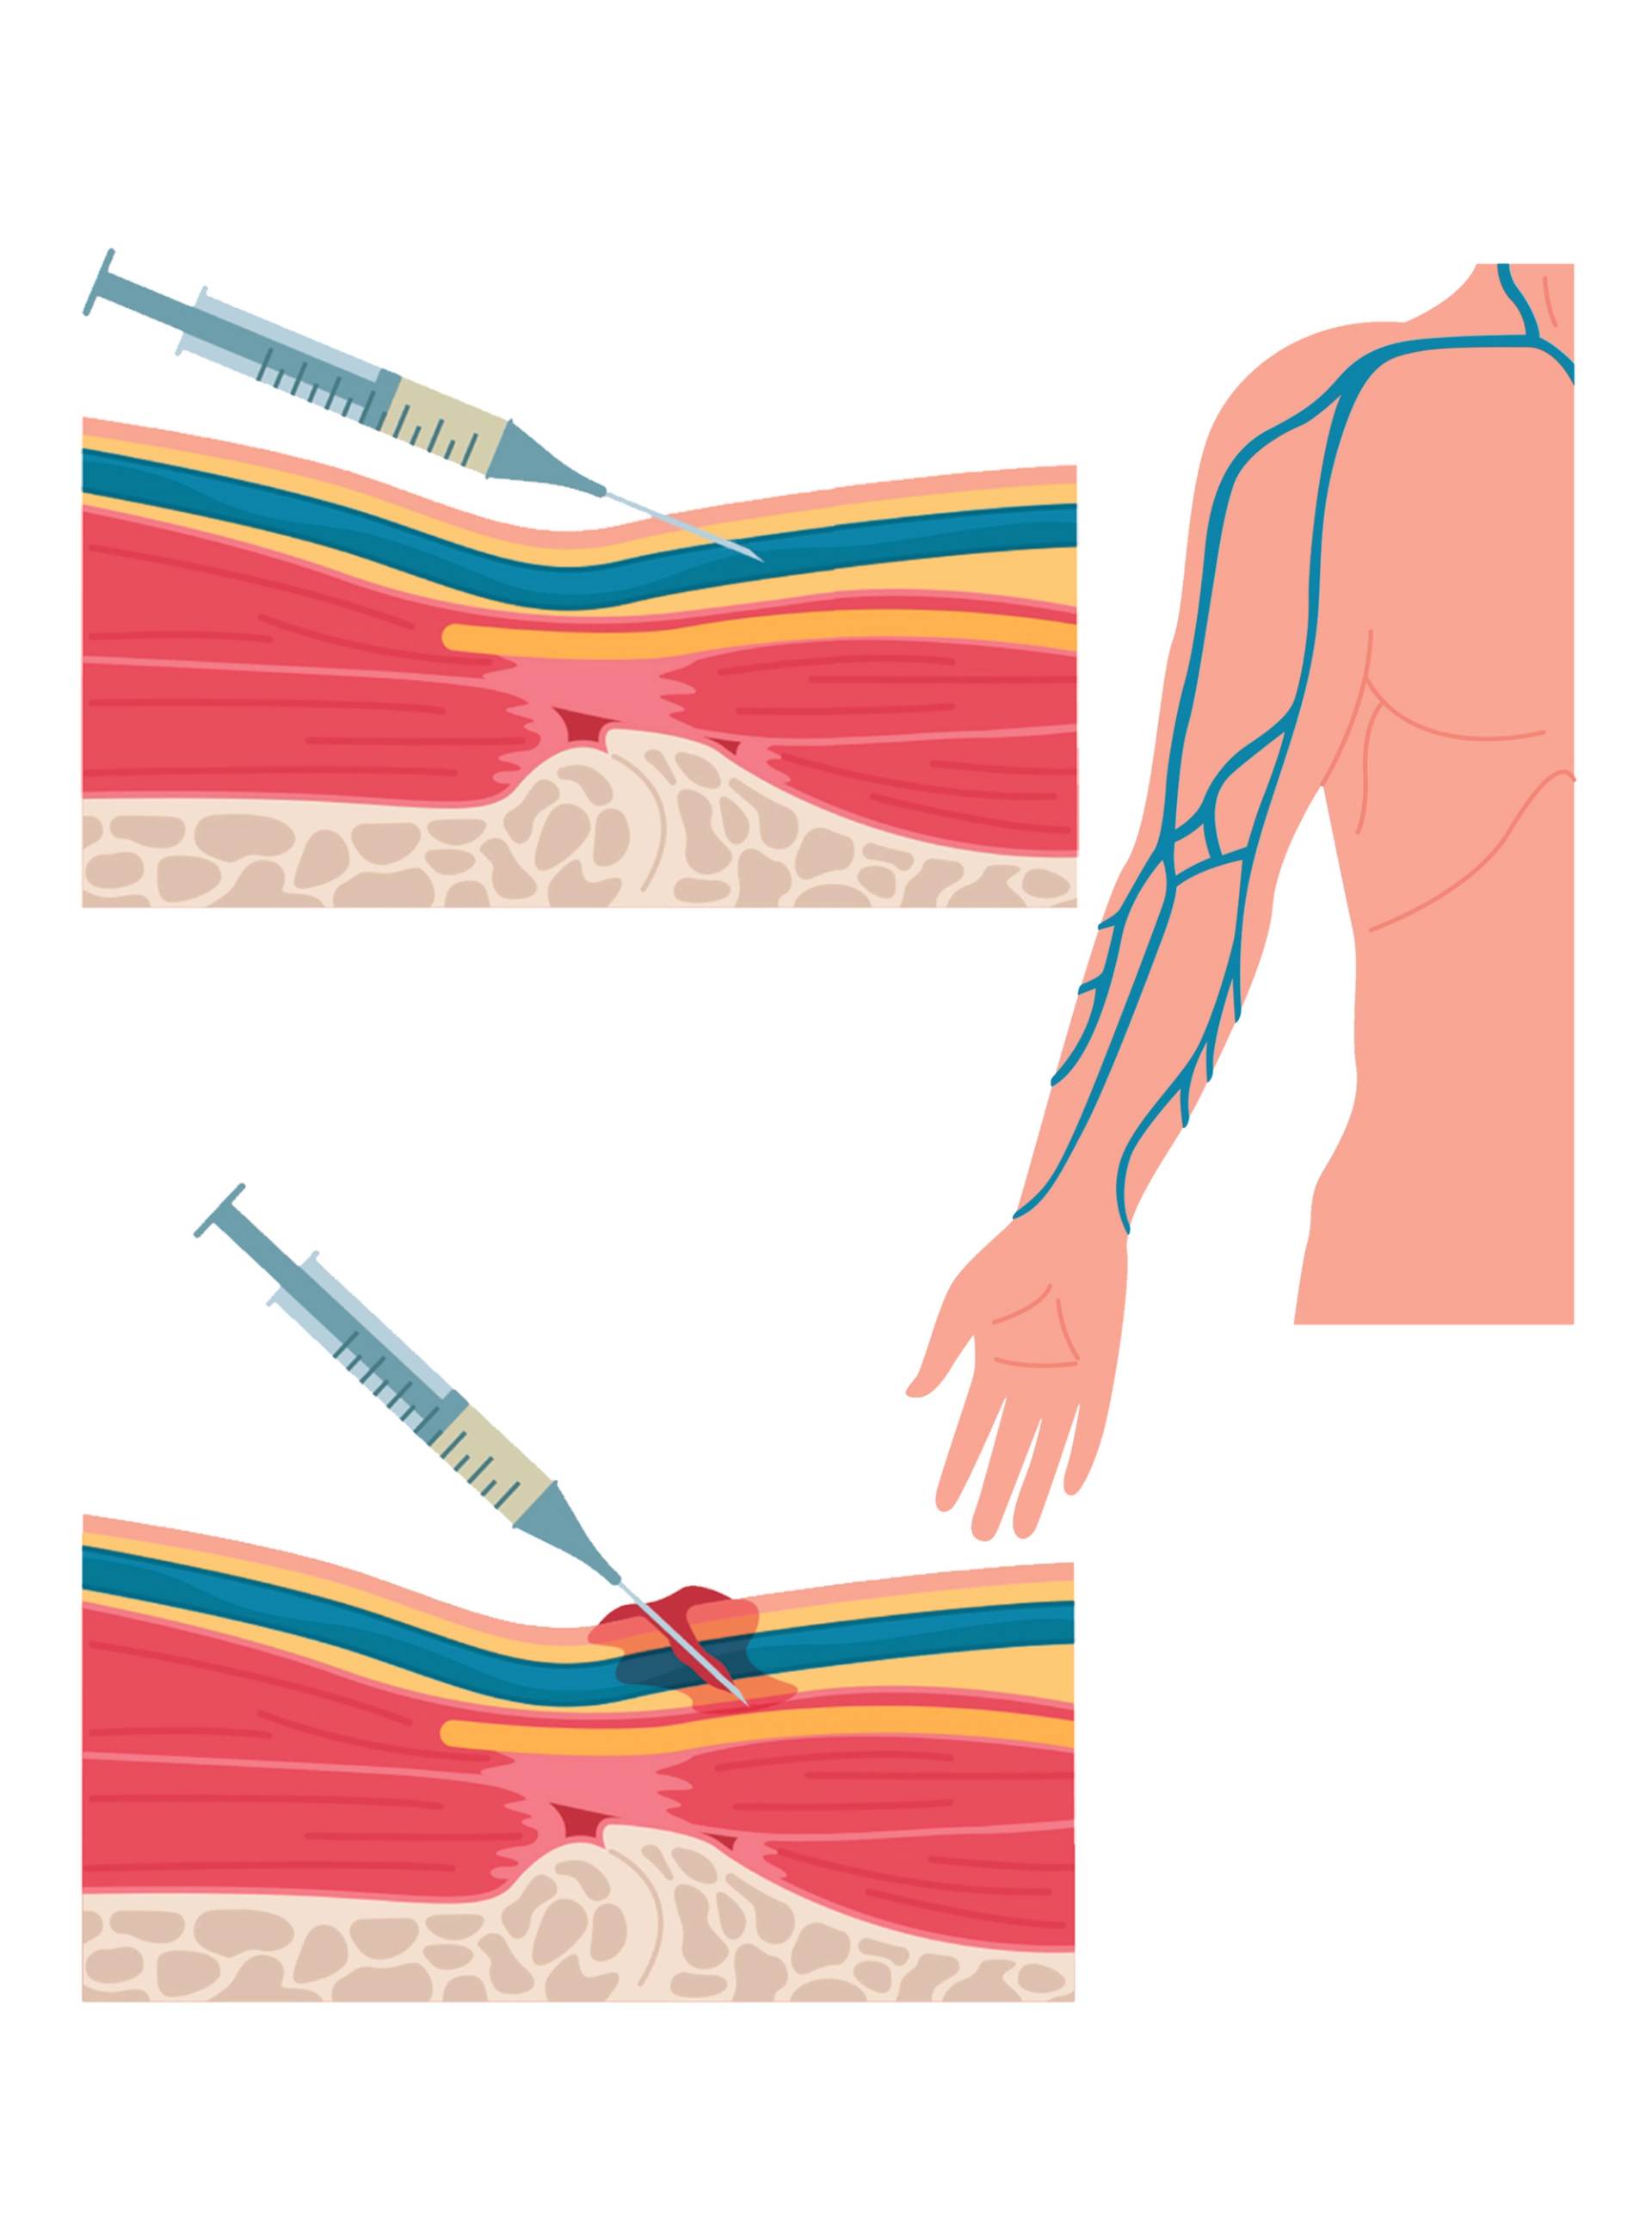
Needle angle
Insert the needle at a 15-30 degree angle with a smooth motion to prevent vein damage and ensure smooth blood flow.1 Hold everything securely and confidently to avoid micromovements that could result in accidentally inserting the needle too deeply or withdrawing the needle prematurely during the connection of the tubes.
Tube handling
Ensure tubes are filled to the correct volume and gently invert them as needed (the number of inversions are usually stated in the order of draw posters) to mix anticoagulants properly, preventing clotting or haemolysis.12 Each blood collection tube usually has a fill mark on the label. Filling below this mark (underfilling) alters the intended blood-to-additive ratio, potentially affecting results. Both major UK suppliers advise that the correct filling volume and mixing is essential for accurate diagnostics. A study in 2019 found that 10-20% of all specimens rejected were due to incorrect sample size.13
Order of draw
Ensuring that the samples are drawn in the correct order is crucial to avoid inaccurate results or repeated venepuncture due to sample cross-contamination. When connecting tubes, especially if there are multiple types, always follow the correct order of draw, which is usually blood culture first, then coagulation, then serum tubes.1 The manufacturers often provide posters with their equipment to ensure correct order of draw is followed (see Resources).
COMMON PITFALLS AND HOW TO AVOID THEM
The vast majority of errors in laboratory medicine occur in the preanalytical phase.14
1. Difficult or small, fragile veins
This is particularly common in primary care, where nurses often see elderly patients or those with chronic illnesses. Management strategies include:
- Encouraging hydration before the procedure, as dehydration causes veins to collapse.1
- Using a warm compress to dilate veins, increasing blood flow and visibility; dry heat is better than moist heat. Heat considerably increases the diameter of veins after application, and using dry packs rather than wet towels gives a better result.15
- Repositioning the arm or using gravity to help blood flow, aiding venous filling.
- Considering alternative sites, such as the dorsal hand veins.1
2. Haemolysis
Haemolysis (breakdown of blood cells) can lead to inaccurate test results or the test not even being processed in the first place. To prevent this:
- Avoid excessive tourniquet time12
- Use a needle of appropriate gauge16
- Ensure gentle handling of blood samples, avoiding forceful aspiration or shaking of tubes.1 The device you are using should also be considered here. Sarstedt (S-monovette) tubes, for instance, are particularly good for avoiding veins collapsing or blood cells being damaged by strong vacuums. They have a plunger fitted to the tube to titrate the amount of pressure on the blood that is collecting so can be used gently. BD Vacutainer vials do not have this feature.
- Let alcohol dry completely before puncture.
3. Needle placement Issues
Missing the vein or inserting the needle too deeply can cause complications such as haematoma formation or nerve damage.
- If no blood appears, slightly adjust the needle angle or depth7
- Avoid ‘probing’1
- Seek assistance rather than repeatedly trying on the same patient.3 Find out from your policy how many ‘goes’ are ‘acceptable’ to have in your area of practice before handing over to someone else or re-booking the patient.
- Take your time in order to get it right. Don’t be tempted to skip the palpation stage.
- ALWAYS check BOTH arms for the most suitable area first.
4. Patient reactions
Some patients may experience dizziness, fainting, or anxiety.
- Monitor for signs of distress and keep the patient informed throughout the procedure17
- Encourage deep breathing techniques to reduce anxiety or distraction methods such as ‘applied tension’ to reduce fainting risk.18 Contrary to the assumption that patients should be encouraged to ‘relax’, applied tension involves tensing different muscle groups to maintain the blood pressure to reduce the risk of a sudden drop that might lead to a faint.
If fainting occurs, ensure the patient is in a safe position and provide reassurance, and clinical monitoring if necessary.1
5. Documentation errors
Proper documentation ensures patient safety and traceability. In general practice, incorrect documentation can result in serious consequences, including delayed diagnoses and repeat venepuncture.
- Label tubes immediately after collection in the presence of the patient16
- Record all relevant details, including time, date, and any difficulties encountered, including information about failed attempts, not just successful ones1
- Double-check that information matches patient records to prevent serious errors in test diagnosis and/or treatments3
AVOIDING ‘ROOKIE ERRORS’: 10 TOP TIPS
1. It’s common to be nervous when you first start practising this skill. There are likely to be some failures along the way and it can take time for confidence to build up. It’s important to practise regularly and reflect on your advancing skills.
2. Do a course on phlebotomy! There are plenty of options out there, both face-to-face, virtual and e-learning depending on your needs, your context, and the level of physical supervision you have access to in practice. See Resources
3. Try to start practising soon after a course while it is all still fresh in your mind. Practice models are worth having to aid in refining your technique so there is no risk to patients while getting to grips with technique and using the equipment.
4. Find a good mentor who has done proper training – not someone who does things ‘just because that’s the way it’s always been done’ or has picked up some bad habits along the way. Mentors are not just there to support you – they can also offer a welcome distraction to the patient while you are concentrating. Dual-tasking (drawing blood while keeping a patient happy and comfortable at the same time) is a skill that comes only with practice. Let your mentor focus on the patient while you focus on the procedure in those early stages of learning.
5. You don’t have to be performing the procedure itself to gain practice with finding veins or applying tourniquets. Practice vein selection on different patients or even friends and relatives to improve palpation and tourniquet skills.
6. Seek feedback from experienced colleagues to refine your technique and troubleshoot challenges.17
7. Observe as many venepunctures as you can and do as many under supervision as you can before going it alone.
8. Familiarise yourself with different blood collection systems, such as vacutainer and syringe techniques, or butterfly and straight needles, to ensure flexibility in approach. Where you are working when you’re learning may not be the same place you work later on. Be familiar with all the different types of devices and then the transition will be easier if your new place of work uses a different supplier.
9. Always follow local protocols and never rush the procedure, as errors can compromise patient safety.3
10. Aways know the rationale for why you are doing the procedure you are doing. No-one wants to be in that tribunal without an adequate, evidence-based justification for their actions or omissions!
CONCLUSION
Phlebotomy is a key skill for general practice nurses, requiring both technical proficiency and patient care. By following best practices, avoiding common pitfalls, and learning from experience, nurses can ensure safe and effective blood collection. Ongoing education, feedback, and hands-on practice will help build confidence and competency in this essential aspect of primary care nursing.
RESOURCES
BD-vacutainer products: https://www.bd.com/en-uk/products-and-solutions/products/product-families/bd-vacutainer-blood-collection-tubes
S-Monovette products: https://www.sarstedt.com/en/products/diagnostic/venous-blood/s-monovette/
Policy template for use in general practice: https://www.infectionpreventioncontrol.co.uk/resources/venepuncture-general-practice-infection-prevention-control-phlebotomy/
Sarstedt order of draw poster: https://www.sarstedt.com/fileadmin/user_upload/99_Gebrauchsanweisungen/Englisch/644_c_PosterA3_AnleitungVenoeseBE_SafetyKanuele_GB_EU_0314.pdf
BD-vacutainer order of draw poster: https://compendiumapp.com/post_4RIIGK-UW
Guide to avoiding preanalytical errors: https://www.sarstedt.com/en/products/new-products/tips-techniques/
Phlebotomy training (face-to-face, e-learning, and virtual classroom courses): https://healthacademyonline.co.uk/phlebotomy-venepuncture-courses/
Phlebotomy practice models: https://healthacademyonline.co.uk/course-categories/phlebotomy-training-kit/
Applied tension techniques – video from NHS Scotland National blood transfusion service: https://www.youtube.com/watch?v=eVgTBdM7tEo
Advice and case studies of reasonable adjustments for those with learning disabilities: https://www.gov.uk/government/publications/blood-tests-and-people-with-learning-disabilities/blood-tests-for-people-with-learning-disabilities-reasonable-adjustments-case-studies
REFERENCES
1. World Health Organization. Guidelines on drawing blood: best practices in phlebotomy; 2010. Geneva: WHO Press. https://www.who.int/publications/i/item/9789241599221
2. NICE CG139. Healthcare-associated infections: prevention and control in primary and community care; 2012 https://www.nice.org.uk/guidance/cg139
3. Nursing and Midwifery Council. The Code: Professional standards of practice and behaviour for nurses, midwives and nursing associates; 2018. https://www.nmc.org.uk/standards/code/
4. RCN. Glove awareness campaign; 2022. https://www.rcn.org.uk/Get-Involved/Campaign-with-us/Glove-awareness
5. Mast ST, Woolwine JD, Gerberding JL. Efficacy of gloves in reducing blood volumes transferred during simulated needlestick injury. J Infect Dis 1993;168(6):1589-92.
6. Yoshimoto A, Yasumoto A, Kamiichi Y, et al. Analysis of vasovagal syncope in the blood collection room in patients undergoing phlebotomy. Sci Rep 2020;10(1):17933.
7. Kiechle FL. Blood collection: A practical guide. 2nd ed. Bethesda, MD: American Association for Clinical Chemistry; 2016
8. Bunce A. Alcohol swabs and intramuscular injections: where do we stand? Practice Nurse 2025;55(1):8-11
9. Srikanth KK, Lotfollahzadeh S. Phlebotomy https://www.ncbi.nlm.nih.gov/books/NBK574569/
10. Leitch A, McCormick I, Gunn I, Gillespie T. Reducing the potential for phlebotomy tourniquets to act as a reservoir for meticillin-resistant Staphylococcus aureus. J Hosp Infect 2006;63(4):428-31.
11. Mukai K, Nakajima Y, Nakano T, et al. Safety of Venipuncture Sites at the Cubital Fossa as Assessed by Ultrasonography. J Patient Saf 2020;16(1):98-105.
12. Lippi G, Salvagno GL, Montagnana M, et al. Quality of venous blood sampling: A narrative review. Clinical Biochemistry 2013;46(6):449–454.
13. Lippi G, von Meyer A, Cadamuro J, Simundic AM. Blood sample quality. Diagnosis (Berl). 2019 Mar 26;6(1):25-31
14. Lee NY. Types and Frequencies of Pre-Analytical Errors in the Clinical Laboratory at the University Hospital of Korea. Clin Lab 2019;65(9).
15. Yasuda K, Shishido I, Murayama M, et al. Venous dilation effect of hot towel (moist and dry heat) versus hot pack for peripheral intravenous catheterization: a quasi-experimental study. J Physiol Anthropol 2023 Oct 19;42(1):23. doi: 10.1186/s40101-023-00340-5.
16. Clinical and Laboratory Standards Institute (CLSI). Collection of diagnostic venous blood specimens. CLSI document GP41, 7th ed. Wayne, PA: CLSI; 2017
17. Weinger MB, Engelhardt S. Venous access and patient safety: Best practices for phlebotomy. J Patient Saf 2014;10(2):102–109
18. Cheung CHY, Khaw ML, Leung WS, et al. Effects of Performing Applied Muscle Tension during Recovery after Phlebotomy in Young, First-Time Donors: A Pilot Study. Int J Environ Res Public Health 2021;18(19):10541
Related articles
View all Articles